We have received many requests for assistance with making the Irdroid USB Infrared Transceiver to work with the Raspberry Pi and in particular with Raspbian Linux OS distribution. Below we provide a step by step guide for making the Irdroid USB Infrared Transceiver working with the Raspberry Pi. In this particular example we will be using a Raspberry Pi model B+ with 512 MB of RAM as a medium for running the open source software LIRCd , responsible for sending and receiving infrared commands in Linux.
I am using the following tools ( Hardware ) for our tests:
- 1x Raspberry Pi model B+ 512MB RAM
- 1x Irdroid USB Infrared Transceiver
- 1x 16GB SDcard for the raspbian installation
I also use the following software tools :
- A custom port of LIRC for the Irdroid USB Infrared Transceiver (Source code available for download – see the links at the end of this Blog post)
- We will also use Raspbian , installed using NOOBS on a 16 GB sdcard.
- The Irdroid USB Infrared transceiver uses the standard Serial ACM drivers in Linux that come with most Linux Distributions. Raspbian also has this driver built-in , so we do not need to compile custom drivers etc for making it work with this Linux Distro.
- You will have to download the custom version of LIRC (that support the Irdroid USB IR transceiver) from our website, so step #1 is downloading LIRC
- Open a console via SSH to your Raspberry Pi, and type the following command to download LIRC:sudo wget https://irdroid.com/wp-content/uploads/downloads/2014/01/USB_transceiver_LIRC.tar.gz
- Extract the archive and “cd” in the “irtoy” directory
- Type “./configure.sh” Once it completes issue:
- “sudo make install” , this will compile LIRC and it will install it. Once the operation completes. You have a LIRC installed on your system, we still have to make install a lircd.conf file with the remote control “database” in it , so that LIRC can generate IR commands and blast the commands over the Irdroid USB IR Transceiver module.
- Issue the following command “cd /etc” then issue “sudo mkdir lirc” “cd /lirc”
- Then Issue “sudo wget http://irdroid.com/db/t.conf -O lircd.conf ” to download a sample config file with a sample “remote controls database”
- Then insert the Irdroid USB infrared transceiver module in a free USB port on your Raspberry Pi, the module should be enumerated and it should show in the system as a serial ACM device (by default if no other serial ACM devices enumerated it should be ttyACM0)
- to start LIRC issue “sudo lircd –device=/dev/ttyACM0 –listen=8765” this will instruct LIRC to listen on port 8765 on All interfaces
You can also add the command above into the rc.local file , so that you have a lircd running on boot. (before that command you need to add “sudo mkdir /var/run/lirc” so that allowing lircd to create its pid file in that directory).You should be able to connect to the LIRC daemon on the Raspberry Pi IP and Port 8765
Now you can play with the LIRCd Android clients like “Amote” and also Irdroid Macro Remote / NFC Remote , and configure your smartphone as a custom user interface for controlling IR appliances using your newly configured Raspberry Pi Infrared Remote control.
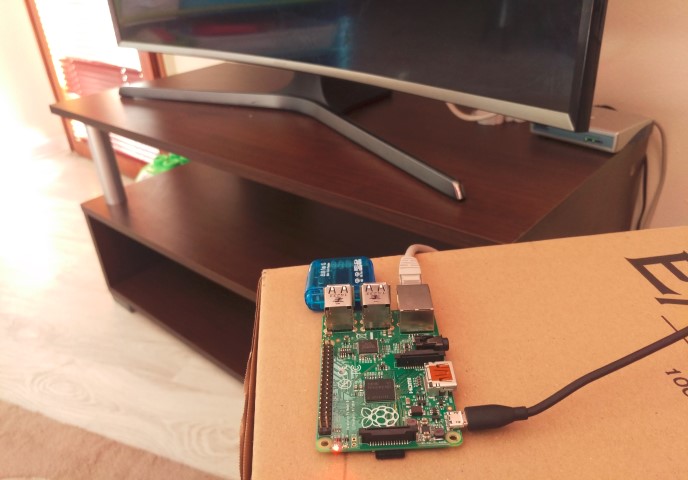
In my particular configuration, my WiFi router is in a room where there was no TV. I had to find a way to assure one ethernet port available in the living room in order to connect to my Raspbeery Pi board. I have found that I have two SMC powerline adapters, that work in transparent bridge mode, so voila I got that remote ethernet port for my Pi.
In my case the Raspberry Pi board is connected to my home WiFi router and the router has provided the Pi with a 192.168.1.4 IP address. To use it as a remote control with Any android device you will need to download the “Amote” application for android which will allow you to setup the lirc client network setting, and to configure a custom remote with layout and button naming.
The amote app will allow you to.
- Configure the network settings to connect to The lircd that runs in the Raspberry Pi
- Allow you to connect to that lirc daemon and query for the remotes in its lircd.conf file.
- To assign and make custom buttons and interface for any of the remotes in the Lirc database . Below are some screenshots and videos.
- Amote Screenshot
- Amote Screenshot
- Amote Screenshot widget
- Irdroid USB and Raspberry Pi
For convenience you can make the LIRC daemon to start on boot as a service.
We have a special discount ( 20% Off )offer for Raspberry Pi owners, you can purchase a Irdroid USB IR Transceiver with discount using the link below and applying the “raspberry” coupon on checkout .
http://www.irdroid.eu/product/usb-infrared-transceiver/
We also provide a ready configured and tested install of the LIRC daemon on a sdcard so that you can directly plug the card to your Raspberry Pi (for model B+) and save you some typing in the terminal. You can purchase a 16 Gigs SDcard with Raspbian and LIRCd configured for Irdroid from the link below:
Downloads:
- LIRC for Irdroid USB infrared transceiver
- Irdroid USB Infrared Transceiver user manual.
- The “Amote” Lirc client for Android
- The “Irdroid Macro Remote” client for Android ( set macro commands / IR sequences)
- The “Irdroid NFc Remote” client for Android (Set macro commands and store them on a NFC tag , tap on the tag to execute )


